

The first thing I did was make the bed frame. The bed is 5 1/2ft long by 3 ft wide, I measured out all the timber and screwed them together to make a basic rectangle frame with wood going across the middle and at each end. I then nailed ply wood to the structure, around the sides and to the wood going across the middle. Next to make the sides higher I nailed on plywood which was 1 ft high to the sides to make the sides twice as high as this is where the foam will be put into to.


Then I made the panels which go on the front of the headboard and footboard. for this I used 6mm MDF , I drew out the panels on the wood and then used the ban saw to cut them out. Then I sanded the edges and sides of panels.


Next I drew out the shape of the headboard and footboard on to 18mm MDF. I then cut the curve on the top of the headboard and footboard using the jigsaw.


I then used the detail sander to sand the edges of the curves.

Next I glued the panels to the headboard and footboard, I also nailed each corner of the panels to make them more secure.


I then went on to making the posts. To make these I used timber wood, I cut two pieces of wood 1 ft longer on each end to the size of the headboard, I then cut two 1ft pieces of wood and glued these to each end of one of the pieces of wood, I then stuck the other piece of wood on top of the two smaller pieces. I did this to all four bed posts.


Once the glue had dried the sides of the bed legs where rounded off using the wood router. I then used the wood lathe to round and narrow one end for the bed leg and then I rounded the other end for the top of the bed post. I did not put enough glue on the wood so the wood actully came apart when using the wood lathe so I then had to take all the wood apart and re glue them all.This time I was advised to put lots of glue on and then clamp them together which is what I did. So when I went to use the wood lathe again the wood stayed together. The bed posts for the headboard where twice as big as the ones for the footboard so they where to long to use on the wood lathe so I had to use the sanding machine instead. I them smoothed the bed posts out using the detail sander.


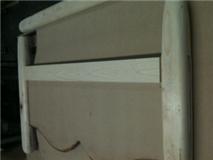
Next to attach the bed posts to the headboard and footboard I slotted the sides of the boards into the gaps which I made in the middle of the posts. To secure these I nailed them together. To fill in the little gaps at the sides of the legs where I had attached them I used polly filler. I then screwed a piece of timber to the back of the head and foot boards so I could attach the bed frame to it.


I painted the bed using wood stain which was left over from Adams sofa. The wood stain was quite light and it had ran out so I bought a darker one to go over the whole bed with but the wood stain I bought didn't look very good on the wood so I painted it instead. I painted it with a browny orange colour and them went over the bed with a wash of black and dark brown. I had to go over the bed quite a few times as the wash was to watery but we didn't have any paint left to thicken it up.


After the paint had dried I went over the whole bed using button polish to give it an aged look. For button polish you cover the surface with french polish and then drip and brush on methylated spirit, also if you drip on water it gives you these whitish patches which make the wood look worn down and a bit mouldy.


Next I put the bed together, I did this by screwing on the headboard and footboard to the ends of the bed. I screwed it from the underneath so that you couldn't see the screws. The bed was a bit wobbly so Adam had the idea of screwing down little pieces of wood at the end of the bed frame against the head and footboard to stop it from moving. It still wobbles a bit but it doesn't really matter because its only being photographed not used. For the mattress I used foam.


Then I sanded over the bed to give the wood colour a faded and worn look to it. I then filed part of the leg and nailed tiny holes in it to make it look like it had wood worm. I then used a chisel to clip away some of the wood on the leg and head board to make it look like Gregor had been gnawing it. I also scratched other parts of the wood as Gregor may have scratched the wood with his shell as he walked past or climbed on it, he also may have scratched and gnawed it out of boredom and frustration.


Lastly I put the bed sheets, pillow case and pillow on the bed. I aged the bedding by wiping on button polish which also made it look grubby. To make it look more dirty I wiped on a wash of brown paint. I made a patch in the middle of the bed and pillow darker than the rest to show where Gregor may have been laying. Also I added some fake blood to the covers as in part of the story Gregor gets hurt so the blood would have gone onto his covers as he lays in the bed. I then sprayed fire retardant over the whole bed frame and sheets as a health and safety requirement in theatre and film sets.
I am pleased with the design of my bed and think it fits in well with the room. Making and sanding the bed posts was quite time consuming and not having the wood set me back a few days but I managed to do it all on time before the photo shoot. On my original design there was a swirl in the leg and a curve from the leg to the sides of the bed but I haven't managed to add these features to my bed. I don't really think it needs it as the family didn't have much money so I don't want to make the bed to grand and look out of place so I don't really think it matters that I have left out that detail because it looks fine as it is.
No comments:
Post a Comment